Popular search

Jameson Brooks shows three different ways how you can light a face.
Background
In filmmaking, there are infinite ways to light an actor's face. The lighting can establish the mood of the scene, and also help complement the emotion of the character.
Setup 1 Drama
So for this setup, we wanted to make the lighting very dramatic. And I'm a big fan of old war films, and this location looked like an old bunker. So we're going to use that to our advantage, and we're going to use Godox lights to help shape the texture and layers throughout the scene.

So another thing that helps complement the lighting is to use a lens that matches the era of whatever it is you're shooting. So a lot of these old vintage anamorphic lenses have a ton of character. And the older the lens, the more character, is usually how it works. So that's one way to help the historical aesthetic of your film.

So when placing your subject always look for an area where there's a lot of depth. I like this area because this hallway goes all the way back here, and we're shooting into a corner and the corner allows for more dimension within your scene. So always look for a corner whenever you're trying to place your subject where you need to. And the other thing about this spot is this little cutout right here allows us to put a light in here and make it motivated on the subject side of the face right here.
Now that we've placed our subject, it's time to add our key light. So come on back here. I'll show you what we did. In this little narrow corridor, I wanted to add an RGB light. The Godox SZ150R was a perfect choice. So this light, I'm able to dial the hue and the saturation perfectly. So I went with a greenish-yellow tint to hit off this brick wall right here. And what this light is doing is it's hitting off this, it's highlighting the texture along this wall, and that it's spilling onto our subject. But the problem is it was spilling too much onto the subject and it was highlighting both sides of his face. In order to control that, I wanted to add a Godox 5-in-1 reflector. This is the black side. What this is doing is it is absorbing all the excess light, which helps control the shadows and the contrast across his face.


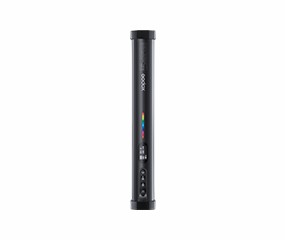
So now that we've established our key light on our subject, it was time to create depth in the background. So the first thing we wanted to do was add two Godox TL 60s, and we took these lights and placed them across the ground right here. And what these lights are doing is they're illuminating all the texture of the brick wall nicely. I think it looks really cool.


So these lights are nice because you can also use the Godox light app, and you can control and modify exactly what you need. You can turn them on and off. You can adjust the hue, saturation, brightness, or anything that you want to dial in your shot.

And so for the next light that we added, this is really where the corner comes into play. So we wanted to take a Godox S60 focusing light. And this light is cool because you can dial in exactly the focus that you want, as hard or soft, or as blurred out, or sharp as you need it. And what we did here is we added a gobo of a window and you just slide one of these guys in here and dial in your shot the way that you need to, and it helps create realism within your scene.


So one thing you're going to run into a lot when shooting on location is these exit signs. They are everywhere. So once we had our shot set up, we thought everything looked good. But it was casting this really weird red light. We didn't know where it was coming from. Well, it was coming from the exit sign. So one thing you can do is you can grab a C stand with a black flag. And what this is doing is it's going to cover up the exit sign. So whenever I have the subject right here, there's no more red light being cast on our subject.


Setup 2 Horror
To create the illusion of our character looking out a window with very thin blinds, we used the Godox S60 with the lens projection attachment. I inserted a gobo with very thin blinds to create the shadow effect that we needed. The idea here was to have her eyes right in between the blinds as if she were looking outside.


With the S60, you're able to control how big or how small your light is on your subject or environment. And in this case, we're creating a really wide beam. And the gobo, through the lens projection attachment, is able to give us precise focus exactly how we want it. For this instance, we wanted to make it look like her eyes were riding between the blinds.

The flexibility of the Godox TL60 tube lights allows you to place these lights pretty much anywhere out of your shot. So we chose to place them in this little cubby back here, just to create the illusion of a little bit more depth, but also to make this shot seem a little more moody and sinister because it is for a horror film. So using lights like the TL60, because there are so many of them, usually whenever I'm behind the camera, I can't really get to them, especially when I'm in a tight space. So using something like the app just allows me to turn them on and I'm ready to go.


So for this shot, I wanted to slowly dolly the camera in towards the subject's face. But seeing as we're in a really narrow hallway, the Godox TL30 was actually a perfect go-to light to give her a little bit more moonlight illumination across her face.


So because we were creating a horror scene, we definitely wanted to use a hazer. It helps create volumetric lighting, and also the light beams that we wanted for the texture of the scene.


Setup 3 Documentary
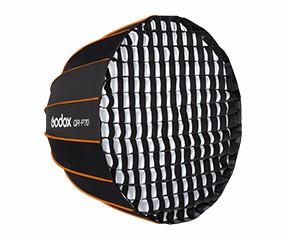
For this setup, we wanted to create a high-key look for a documentary-type interview scene, something with really nice, soft lighting on the subject. So the perfect thing for that is a Godox QR P120 softbox. This thing is great because of its size. It's massive. It allows for tons of soft light to spill across the subject, which is perfect for what we needed. The diffusion fabric of the softbox makes it a nice soft highlight for your subject. I really liked the size of this softbox just because of the area that it can cover. It's got quick-release tabs inside, which makes it a breeze to work with. It's really easy to set up and take down, unlike most softboxes this size.


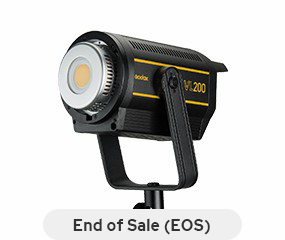
And another great thing about this softbox is that it has a Bowens Mount, so it easily attaches to a light like a Godox VL300.

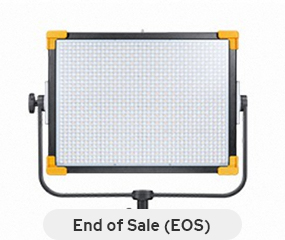
So from here, we have a Godox LD150R. And this light is serving as our backlight. And this helps give her an extra added contrast to her backside, which pulls her away from the background.


I've added the softbox with the grid attachment. This helps soften the light on the backside of the subject, and also keeps the light contained just to keep it right where we need it without it spilling all over the environment.


I can even adjust the hue, saturation, and brightness all within the app.

Even though we're just focusing on lighting the face, looking at your background is also very important. So for this, we have the Godox S60 and a lens projection attachment. It's casting a beam across this wall, behind the subject, just to give the shot a little more interest. I even added a Godox gobo with a window frame to cast a shadow of a window onto the wall.


So when you're lighting a face for a documentary setup, one thing to keep in mind is the quality of light. So we have a lot of soft light going on over here. But on this side, we want to keep it darker just because we want more contrast. We're going to make it more interesting and add a little bit more mood to our shot.