Popular search
Jameson Brooks shows how to create color contrast lighting to establish mood and bring interest and definition to the different scenes.
Background
Today, we're going to be creating a few different scenarios where we're using color contrast lighting. Using contrasting colors can help not only establish the mood but can also bring interest and definition to the scene. This look has become extremely popular in movies, fashion and high-end commercials. Fortunately, Godox has the solution to replicate this high-end look with their full range of RGB Lights that can give you millions of unique color combinations.
So, we are here today in this mid-century modern home to add color contrast lighting to an already well-lit scene. For instance, this kitchen is already looking nice. So, what we're going to do is add some color with some Godox TL-60 Tubes and a few other Godox Lights to make it come to life.
Setup 1
So for this first setup, what we want to do is block our talent. So here's our lovely talent, and we're going to show her exactly what we want her to do. Very complex today. Today, we're going to be making a bowl of cereal.
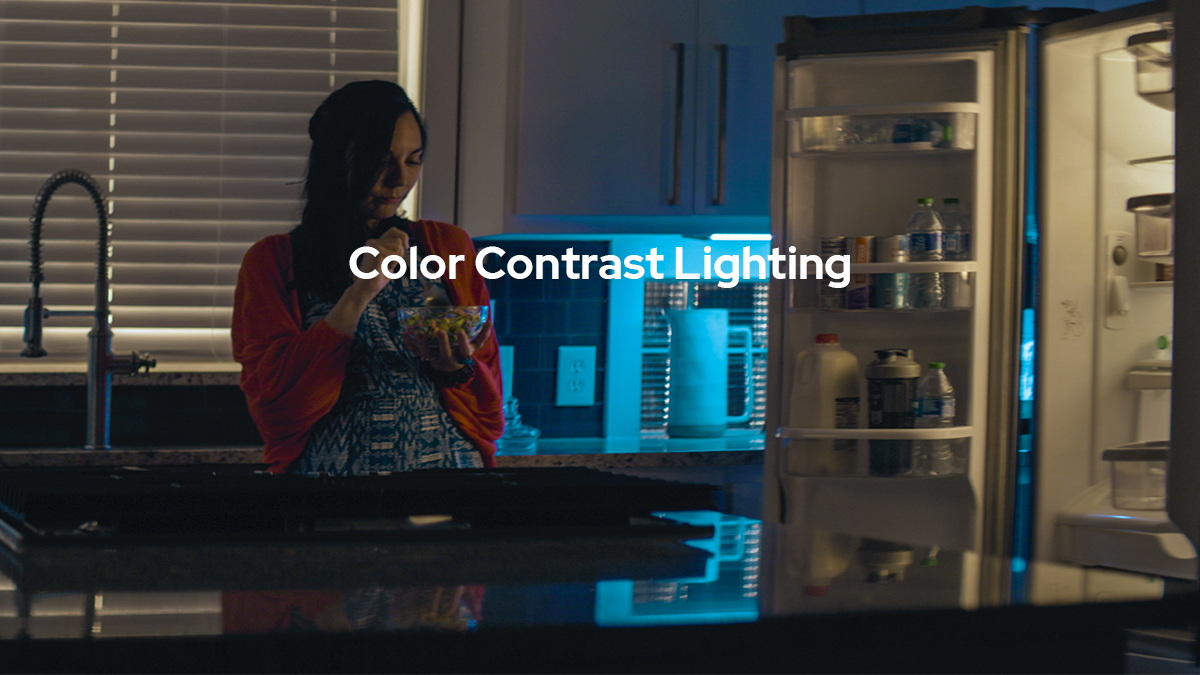
So, the lighting is so flat. It's already really good, but we want to make it look even more interesting. Adding some color contrast to it, it'll make this scene pop and it'll make a small action. Just pouring a bowl of cereal looks nice. So as far as props go, we wanted to use a colorful cereal, because we felt like that would help complement the color contrast style that we're about to pull off. This kitchen has a nice little cubby right here, where it has a practical source already. Kitchens also have these cabinets and areas under here to hide lights, so that's what we're going to do.
We have our subject placed right here, and in another area, we can hide lights to help balance out the light from over there. And then, another idea you can do is open up the refrigerator and normally you get a nice practical light from there as well. We want to use this refrigerator for the shot, but the light in it is really bright and it doesn't really match any other practicals going on. So, it's nice to be able to customize something like this. So what we're going to do is tape some gaff tape and we are going to tape these little sensor things right there, that'll get rid of that. And then that way, we can place our tube light inside and control exactly the temperature and the brightness that we need for our scene.
So, here we are with the house lights on and it's still looking really boring. So one way we can fix that is by turning out the house lights themselves, we still have this one practical source way over here. This light is coming off a little bright and the intensity is a little too much, I think for what we're going to build. So normally, we use the practicals as our starting point and we build off of them. But for this instance, since this is so bright, I think we should probably replace it with a Godox TL30 and we'll go from there. So, we want to replace this bright lamp in our scene. The best way to do that is to grab a Godox TL30. This light is very small and portable, and I can match the color temperature of that lamp, so that's what I'm going to go ahead and do here. I'm going to turn it down to about 3000 Kelvin, and then I can place this light within here, and then I can turn this thing off, and now we have a nice source that still looks motivated in our scene.

Now, we're back at the fridge where I had this bright, practical light inside, and we wanted to get rid of that. So with some gaff tape, we got rid of it. And now, we're going to add a Godox TL60 Tube Light. This will fit in there perfectly. I think we can conceal it back behind some stuff. And, what I want is the color temperature to match the color temperature of the other light that we display. So, I have this one set at 3000 Kelvin, and the brightness I'm going to increase to 70% or so. And, we will place that back here. Let's see how that looks once we get our picture up. So, this light we easily place right back here. And now, we have full control over the lighting that's coming from inside the fridge.

Now, we're going to put a Godox TL60 underneath the cabinet. And, we can do this by just simply taping it just because the light is so light, but it fits perfectly under here. And from there, I'm able to control it with the Godox Light App on my phone. What we wanted to do here was make it a blue color to contrast with the warm tones coming out of the fridge and the other light over here.


So, that way you get very complementary colors and it looks nice in the scene. So now, that we've added a blue TL60 underneath the cabinet here, we've moved over here and we placed another TL60 under here. And, we did this one blue as well to match the same one, and this creates symmetry and balance within your scene.

So now, we have our contrasting colors happening in the room. We've got the warm tones from the fridge over here. We've got the blue underneath the cabinets, but it's still looking a little empty right here in the middle. So, what we wanted to do was add another Godox TL60 Tube Light. This time matches the color tones of the fridge and the light over here. And with the app, I can quickly turn that on and it illuminates the perimeter of the window here really nicely.

The kitchen had some really cool windows that we wanted to utilize, so what we did is we brought a light outside and using the Godox SZ150R, I'm able to light that one up and illuminate the windows themselves. So, we found a tone that matched the fridge and the other light from the inside, and we shine that through these windows, just to give the windows a little more illumination and to make them pop.

So, it's nice about being able to control the lights with the app as I can simply kick the lights on or modify them however I need to, while still looking at my shot in real-time. And, it is a very useful tool while filming on set. Not only is lighting making your scene more cinematic, but so as the camera moves, that's one thing to always consider, is just even a slight movement will really help your scene come to life.


Setup 2
For this next setup, we wanted to take a simple action and make a very dramatic scene out of it just by changing the light. What we liked about this area of the house was that we could have the subject be right here in the center, and it also allowed us to have three layers of depth, and we can color contrast each layer to make it look high-end. Another nice thing about this area in the house is that it had a lot of these practical lamps everywhere, so what we did is we took Godox Lights to help complement these practicals to create even more layers within our scene.
So to create depth within our scene, we wanted to light the back patio through the window. So to do this, we used the Godox's SZ150R. I quickly was able to dial in the RGB Mode to a cool purple tone and it really complements the rest of the scene nicely.


So once our practicals were set, there was one light in particular that really stood out and it was this pink love neon, and the pink in this light helped motivate the rest of the lighting in the scene. So, once we established that we really liked the pink tone from this light right here, we wanted to expand it to the lower room. So we came down here and we took two Godox's TL60 Tube Lights, and we put them in pink color and it matched the love neon from this other room, and it created depth down here in this lower environment, and allowed us to create shape and dimension and just draw interest to other parts of the room.


So in addition to the TL60 Tube Lights on the ground, we wanted to come over here and illuminate this little contraption here. And we took a TL30, which we easily placed here. And, we wanted this light to complement the same tone that is on the patio. So, this helps create even more depth behind the subject and also creates balance for the same light that we're using outside.


So to add an additional layer of even more depth, we wanted to add a Godox's LD150R Panel Light into the back room and we left the door open, because this just complemented the warm lights that were happening in the scene.


So from here, we wanted to give our subject a nice back light and this light helps separate her from the background. So what we did is we raised an ML60 up high, added a softbox and a grid, and this helps keep the light just contained to the subject. So that way, the daylight balance from this light helps separate her from all the other color tones happening in the background.


And so for the final light, we wanted a key light for our subject. So, this is usually the first light that you place within your scene, but because our motivated light was the pink light and we wanted to create a lot of depth, we wanted her to look more natural in the environment. So this light, we're able to use a Godox's TL60. We wanted to bounce it off of the wall, so that way it creates soft lighting across her face.