Popular search
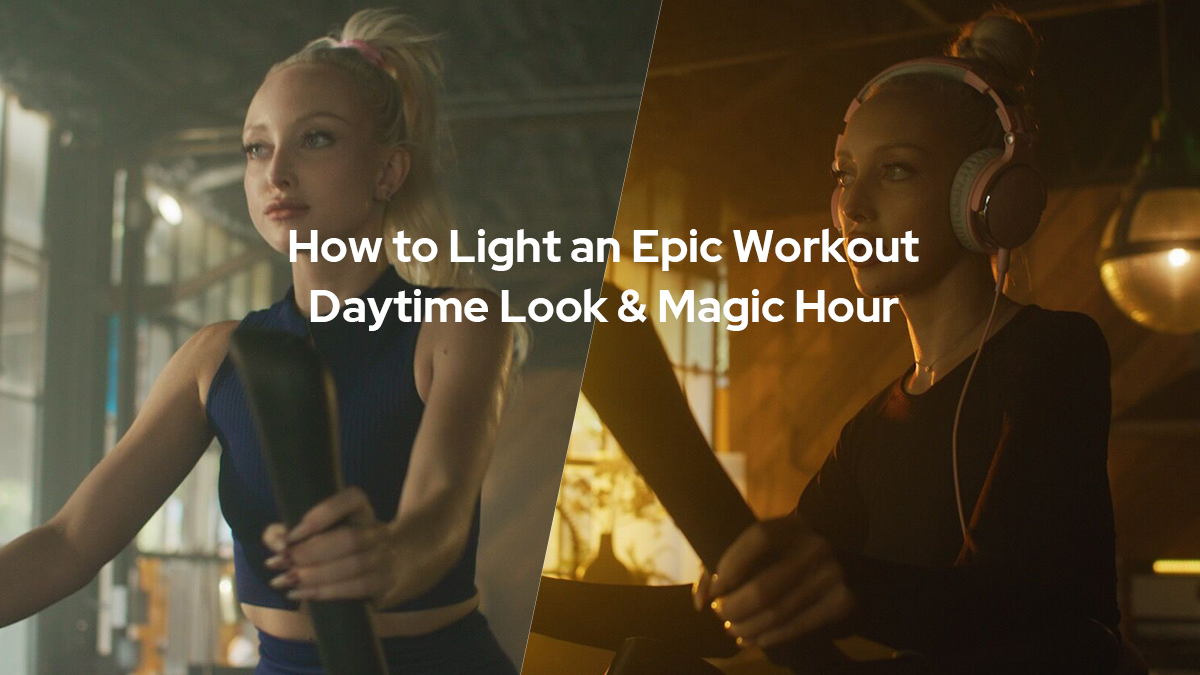
In this episode, the teams lighted for a cinematic fitness shoot for two different looks, one magic hour look and one daytime look with the KNOWLED M series lights. They are sharing everything considered throughout the production like the space, depth of the field, location textures, practical light sources, camera setup, and even how the talent wears to complement color to the environment. M600D, M600Bi, and M200Bi were set up to kick in nice controllable, natural-looking sunlight. Check out the video and see how powerful lights create different times of a day and their all kinds of ideas to do the trick.


The 1st Scene
We are here inside the location for the first time. And just looking around, this has all kinds of features we can use to really make this thing cinematic. You've got steel walls everywhere. You've got these windows that have this cool checker pattern and they're very industrial and tons of texture to work with.


We've got this cool wooden back splash back here behind the kitchen. So really it's just about finding where best we can build our world around. And so as we're looking at the space here, I'm really digging this kitchen setup. There's a lot of different textures. There's that wood back splash that's really cool, that'll look really nice in contrast to all the black, darker elements of the counter tops and just the appliances around here.

So I really think as far as composition goes, we want to see this area in our background and ideally you wanna look for a corner whenever you're trying to place where your action is gonna be based in. So the corner will give us the most depth in our shot. And I feel like right here we can throw in lights outside the windows and possibly put some sort of texture on that back wall right there. And we'll go from there.

So now that we've looked around our location and figured out where we wanna point the camera back into this corner, I think it'd be best if we set the elliptical right in this area right here. This will give us a lot of open space to work with and it'll give us a lot of depth so we can play with depth of field, we can play with all kinds of different ways to scatter the light across the environment.

The idea here is that we angle it this direction, so then that way the light is gonna cast through here and it's gonna be darker and more contrast on this side of our talent's face. So I think angling it this way should be our best bet as far as setting this up in this environment. So now that we've established where we wanna actually build our scene around, I like to talk to the set decorator and kind of see what he thinks we should do and how to make things kind of come to life and make it more cinematic within the space. So this is Wally's gonna be our set decorator. What do you think of the space?

I think it's great. It's it's very wide open lot to work with. Ideally you want some color pops you don't want the background to go muddy. So luckily we have a lot of tchotchke here in the kitchen.

That's what this stuff's called right here. Yeah, we call this tchotchke in the biz. In the biz. Industry terms. So we kind of just doll up the table, doll up the background a little bit. It's nice. We have some florals in here, some greens. You said you really like these pink flowers right? Earlier. Yeah, you saw those as soon as we walked in. You're like, Yeah, those are cool. We're gonna have to add those. So yeah, we're not gonna highlight the pink flowers and I much, I like big flowers.

Here we are with our elliptical placed on set and the next step is to test the practical light sources in the location itself. The practical sources are lights that are already at the location, lamps and fixtures, all that kind of stuff.


And so the one thing that we noticed was there was this lamp over here that's giving off this warm tone. It's a little bit too bright and I say we just kill it.

And that way we can actually modify the light with Godox lights. We can bring in whatever we need to control the contrast and the texture and just how much exposure we want to add. The other thing is we really like these practical sources back here, these big bulbs. I think those are really cool. So I think we're gonna lead those on and from here, let's go ahead and build out some Godox lights within the environment.


All right, what's up man? All right, so we've got Joel here. Joel is our gaffer for the day. He's also an excellent DP, so it's gonna be fun to pick your brain and work with you on this one. So our elliptical is placed where we want it within the environment. I'm thinking maybe we kick some sunlight through some of these side windows over here. What do you think?

Cool. Since we have all these really great windows, I think a good starting point would be getting a couple M600Ds up and putting the Fresnel so we can spread the light beams out a little bit more. And I like the texture that this window has given us. So I think the light going through will break it apart and scatter it on that back wall really well. Sweet. Okay, cool. Let's try it out.

So we've got the KNOWLED M600Bi set up right here. Joel's got a couple of them here with the FLS 10 Fresnel's attached to. So tell me a little bit about why you chose this light.

Well, one of the things I really like about these KNOWLED M600s is the output is just crazy, insane, bright.
It's like the sun, right?
Exactly. And having the bi-color option two lets us match anywhere from daylight to Tungsten.

So with these lights, we are placing them up high and angling them down so that way it looks like motivated sunlight kicking in through the windows. So whenever you set lights up outside, think about that directional beam as it kicks down and that you get the angle. Especially if we wanna add haze in our environment, we might be able to get some light beams. Either way, it looks like it's natural sunlight being motivated outside the windows.


Now we have three KNOWLED M600s set up outside, and this is basically bringing our sunlight into our environment. So let's go back inside, check the monitor and see what we got so far.


So we ran into our first problem on set and that was because the sunlight itself was kicking in through our windows and creating way too many hot spots. It was just looking like way too overexposed. So we came outside and Joel is basically adding a solution to how we can block out the sun. So what have you done here?

We've take this large piece of duvetyne fabric and we've go ahead and block out all this natural sunlight that's coming in that's messing with our artificial sunlight.
I think that actually did the trick. Now that we're looking at it, we can see it in real time and yeah, nice work. You got it.


I think now, because these are so bright over here, those windows, let's go ahead and add some gels to some of those squares. It might give us a little bit more color. It might just give us a little more interest on that side of the screen.
So the blue one, and then you wanna put one right there?
Yeah, I would say even, let's do some back here.
Back here. That's where it's really hot.
So this is why it's a lot of fun to have help on set because we can watch Joel problem solve everything that we throw at him. We're like, Hey, what about this? What about that? He's the guy that makes it happen. So it's always nice.

So we looked at our frame and we think that adding a little bit of an accent light over here on the oven would work out pretty good. So I've got a Godox TL60 right here, just a tube light. And we're gonna turn that on and we can match the tone from this light to this light. So it looks like it's actually a practical source.


So I think if we just stick it right back here, it should do the trick and just give us a little more interest back here on this back wall.


You can kick a light right here. We can even bounce it like kick it through here, bounce it onto her through, this area.


All right. So our set is pretty much dressed and ready to go. So we've got our tube light, our TL60 over here. It's our accent light on top of the oven. We've checkered the windows with a couple of gels. We put the duvetyne cloth outside here that's blocking out all that sunlight. And as we travel through here, you see all the checker gels just giving us cool textures. We've got the KNOWLED M600s outside that's kicking in some nice controllable, natural looking sunlight. And then we're gonna keep coming over this way. Here's where our talent's gonna go. We've turned some practical lights on just so that we can have a few other practical lights within our environment. And we've got a KNOWLED M200Bi and that is bouncing off of this poly board right here, which is gonna fill our subject nicely. It's gonna have nice diffuse soft light across your face.

So a thing to consider whenever you're looking at what you want your talent to wear is look for maybe something that's a complimentary color to your environment. So we have a lot of orange and tungsten color through the windows and the background. So I really think going with a blue, which is a contrast color to the orange, would actually work out pretty good. What do you think? Yeah, it's a great idea and I love that we have a splash this blue here and to mimic it. Yeah, I think that's the one.

So fitness commercial, we need sweat. So to save time, a matter of efficiency, we use glycerin. So typically we mix one part, glycerin two parts of water, and it keeps the sweat on the skin, and that's what makes it look like real sweat, right? And it stays consistent throughout. Yes. That's the most important part. It stays consistent throughout. You can dial it back or you can make it more sweaty. You can make the sweat run or you can make the sweat stay in place.

Our camera set up today, we have a red Komodo with a 35 millimeter lens, and I found that the 35 millimeter is just the sweet spot of what we wanted to shoot today because we can get wide and tight and still get lots of depth of field. And also as far as camera move goes, since this is a fitness commercial and it's gonna be intense and a lot of action type shots, movement is very key. And I feel like the 35 millimeter with the Dana Dolly will be the perfect setup.

Make sure anytime you're using hazer that you incorporate a fan so it evenly distributes the haze.

The final lighting effect:


The 2nd Scene
So for our second setup, we wanted everything to look like magic hours, so we wanted to add more of an orange color temperature to all of the lights.


So this light right down here, we took an M600Bi, basically this is hitting up into this area and it's casting this nice warm light and kind of making the illusion of this warm evening light cascading across this window right here. It just kind of sells the whole fill area of what warm light would be with the sunlight.


And what this one's doing, this is an M200Bi bi-color light, and this light is cascading through the windows and it's making a cool pattern on the back splash inside of the environment in there.


Over here, our two KNOWLED M600Ds with the Fresnels attached to them. And we added CTO gel to give it that orange look. So it looks like that magic hour light. We took both of the M600Ds that we put a CTO over, and we actually combined 'em together to just create one gigantic light source to go ahead and mimic the sun.


So these are set at a 100% power. They're kicking in through there, and it's giving our subject a nice back light, which is creating a rim light and kind of bringing her away from the background. And it really just mimics a really cool sunset type look. And so that's what we are going for.


So now that we're inside, we have created a magic hour look and this is the interior. And what we decided to do was condense our world. And why don't we do that? We pushed everything back. We were trying to create this look, it's still broad daylight outside, so we were getting a lot of lights spill from the sun.
We pushed back so we didn't have to cover as much territory with these front windows, and we can get Tungsten coverage of the back window.
So unless you have 20 lights, you wanna extend all throughout every window of your set. You need to shrink your world. And sometimes that actually plays to your advantage. So that's basically what we do here. In a smaller world is sometimes easier to modify and create modify.

For our key light for this setup, we wanted to use an LD150R panel light and kick that into a poly board, and that's gonna basically reflect light onto our subject from there, it just softens it. It's gonna make it a more flattering light. What we found out is we had this light matching the CTO, the orange tone that was outside, and our subject was just looking way too washed out. She was all orange. So we took this, we turned it to more of a 4,400K color temp, and that's gonna help kind of bring out our skin tones and kind of separate her more from the background.


So in the original composition, this light was set to Tungsten, but we noticed early on when we were looking at the camera that we needed something of contrast in the background. So we went ahead and put it to a wider light and we set it here to softly touch the back splash of the wood, and it really gave us some depth to the image.


The final lighting effect:


All right, guys. Thank you so much for watching this episode of the Godox Production series. We'll see you next time. Until then, happy filmmaking.