Popular search
#Historical Narratives
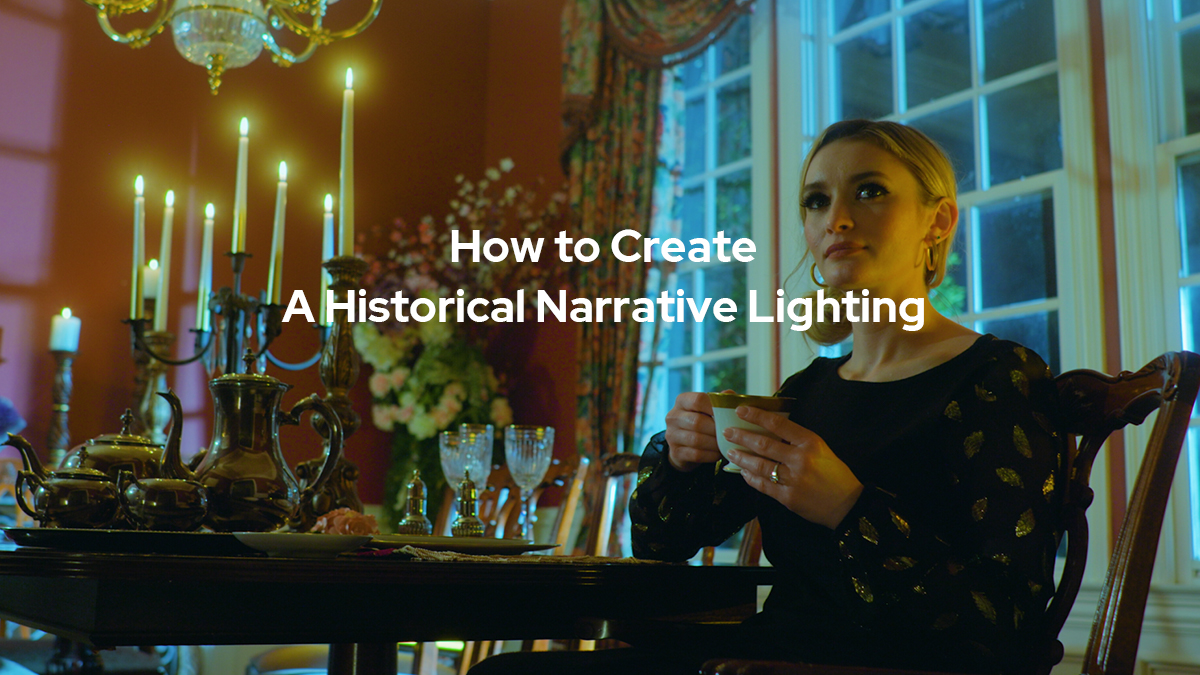
Creating a historical narrative scene is a lot fun, but can also be a bit tricky depending on the era you are portraying. There are many factors that come into play. Things like wardrobe, hair and make up, set design, and of course the lighting. Following Jameson, we will see how to use Godox continuous lights to create the perfect lighting that can easily transform a scene to match any era.
Background of the Project
When creating a period piece it’s important to find a location that will work best for your story. The location is a character itself, just like your subject, so always try to keep that in mind. This will definitely help save on time and budget, and allow you to focus more on dialing in the look for your scene as opposed to building everything from scratch.
For this example, we chose to use a formal dining room. It already had a nice vintage look, and a few practical sources that we could take advantage of. Things like candles, a chandelier, and several props definitely help the scene look like it’s from a different point in time.

Build Lighting for the Scene
Practical Light Only

The 1st Light
The first light I placed was outside of the window. I went with the Godox VL300. I wanted this light to portray a hard lighting source such as the full moon at night. I used the Godox C-stand and arm to place the light very high up. I angled it downward, pointing it directly at the window.
Inside, there was a quite a bit of negative space on the back wall, so I angled the light so that it cast the shape of the window across wall. I set this light to 60% power.

The 2nd Light
The next light was also outside. I placed a Godox ML60 high up, and pointed it directly at the tree. This allows for a bit of color contrast by illuminating the green from the tree, and helps balance the scene behind the subject. This light was set to 50% power.

For the interior lighting I used three Godox TL60 tube lights throughout the room. They are super easy to use, allow for ultimate control of the full 360 degree RGB spectrum, a flexible form factor, wireless operation, and tons of FX and modifiers. And you can easily mount them anywhere.
The 3rd Light
Because this scene is motivated by the practical candles, I used the candlelight effect on the TL60. This was perfect for what I needed, and I was able to easily add it to the scene to add a nice motivated key to the subject’s back and face. This light was set at 16% power.

The 4th Light
I then placed another TL60 in the corner that the subject was facing. I didn’t have room for a light stand in this corner because of my shot. But, since these lights are so flexible and easy to use I literally just leaned the light against the wall. It was perfectly hidden out of camera.
The purpose of this light was to help highlight her face, provide a nice eye light, and also illuminate some of the foreground props. I used the CCT function of the light to change the color temperature to 2700K so that the light appears softer and slightly yellow in color. This helps lighten up her skin tone from the warmer orange light that is cast by all the other candle light from around the room. This light was set at 1% power.


The 5th Light
Now I needed to add a touch of motivated candle light to the back wall. With the help of my lovely poodle assistant…I placed another TL60 on a chair under the table, and directed the light to the back corner. This helps illuminate the back wall just a touch, so that it preserves some extra detail around the room. This light was also set on the candle effect, and powered to 14%.

The Final Light
For the final light, I needed a few stops of ambient fill. So, I placed a Godox SZ150R in the doorway at the back of the room. I needed to balance out the warm color temperature coming from the other interior lights with the daylight balanced moonlight coming in from the windows. The SZ150R allowed me to dial in the exact color temperature I was looking for to balance out the scene.
This light makes things so much more efficient because it eliminates the need to clamp any gels to the front of the light…which is a huge time saver.
I bounced this light off of the ceiling so that the ambient light would spill all around the room, but still seem motivated from all the other sources. This light was set at 3% power.

From here, I added a layer of haze to create some diffusion within the scene.

Lighting Diagram