Popular search
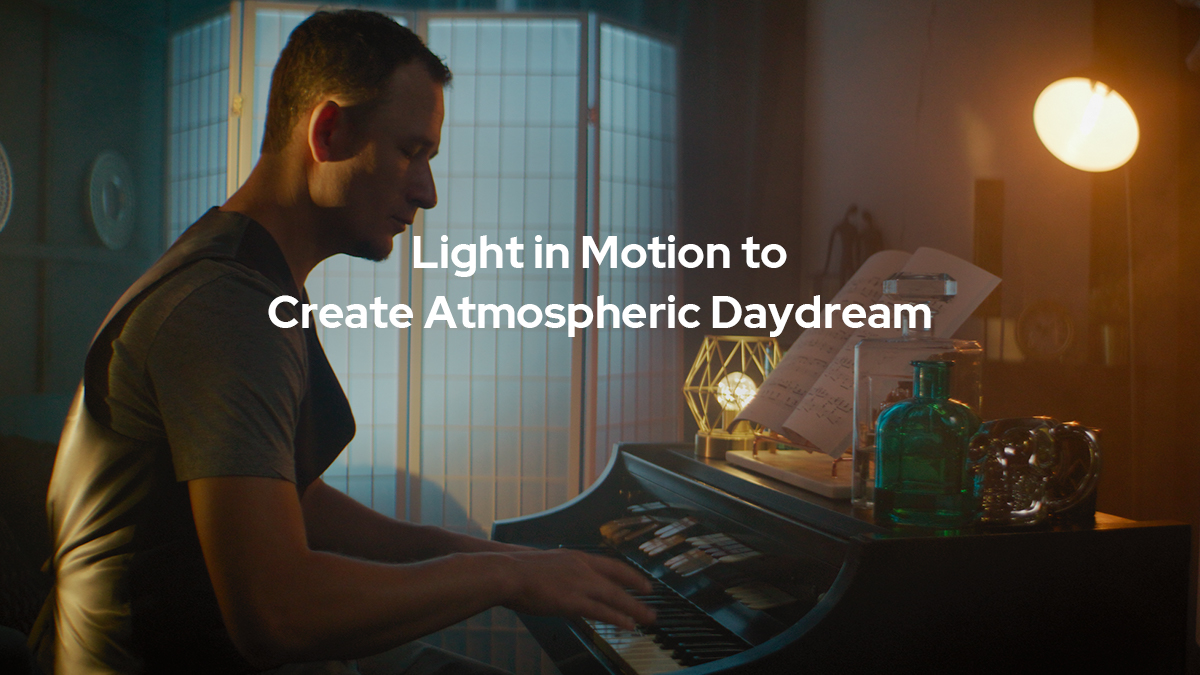
In this episode, Jameson will use moving lights to create an atmospheric daydream in a tiny space. For this setup, he wants to create a scene that metaphorically transforms the viewer into the mind of a composer as he creates a song. Check out and see how he uses various Godox lights to move around the space to give the scene a very dreamy and atmospheric feeling.
Background
Hello and welcome to Godox Film Lighting 101. Today, we'll be using moving lights to create an atmospheric daydream in a tiny space. Let's check it out.
For this setup, we wanted to create a scene that metaphorically transforms the viewer into the mind of a composer as he creates a song. To do this, we are using various Godox lights to move around the space to give the scene a very dreamy and atmospheric feeling. Using lights that move within your scene can help represent a passing of time, a daydream, or maybe even a larger than life moment.
The way the lights illuminate the environment can help drive the story surrounding the actor and can help the audience understand what the character is thinking or feeling within their own imaginary world.
The Location
As for the location, we showed up site unseen and we didn't realize how small the space actually was. So this lesson is going to be more about how to make a dynamic shoot with a very small location. Always make sure that your talent is in good shape so he can help you move your furniture to really make the scene come to life. We have Cody here. He's going to help us move this super heavy piano and we'll see how it goes. The reason we're moving this is to give ourselves a little bit more depth so that we have more depth of field in our shot, and just to make the overall environment seem a lot bigger.
Our set was a little bland when we first got started. We're going to bring in our own props. I just went to a local department store and bought some little knickknacks that seemed to work just fine.

We can just stage this however we need to, but I always find that reflective chrome, like this mug right here, or even this turquoise bottle, stuff up like that will really help with distortion in your lenses and really help add some color to your overall image. I just like how it looks once it's all thrown together. We'll set these in the area and we'll play and just see what we get. I guess that could live there, and this clock could live there. I don't know what to do with this, but what's funny is randomly got this and then the couch happened to be turquoise. So it's always nice when things work out.

Camera Setup
For this scene, we're shooting on a RED Komodo with a Vazen 28 millimeter anamorphic lens. The anamorphic lens is brand new and it's really cool. This is the first shoot that we've actually got to experiment with it and I really like it so far.

To soften it up a little bit, because it is really sharp, I actually added a Black ProMist filter, the 1-8 stop version. And what this is going to do is soften your image just a little bit to help give your image a more dreamy look.

In past episodes, whenever I'm using anamorphic, I'm actually using a magnifying glass to get close-ups because of the close-focus distance. But now, with this lens, you can use a diopter that can just screw onto the front. This is actually a plus two diopter and it just allows you to get even more extreme close-ups when using anamorphic.

Lighting Setup
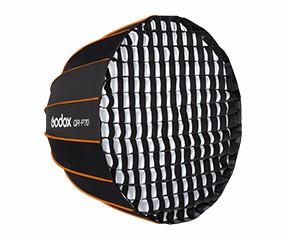
As far as our key light goes, we wanted to add a little bit of extra exposure throughout the overall environment of our scene. So we used a Godox UL 150. We raised it way up high on a C stand and used the QR-P120 softbox, and we put the grid and a cloth on there and that diffuses the light evenly across our subject. It helps bring out his skin tone without casting a hard light all across our subject and the rest of the environment.


One of the challenges whenever we booked the location is we thought we actually had windows in our scene and it turns out there's actually a flat wall and no window for our scene. We made an adjustment, and so a lot of times you're going to have to make adjustments on the fly on set, especially whenever you've never seen the location before. So we needed to create our own fake window. So we added a Godox LD 150R panel light, and this is full RGB light. It's got millions of color possibilities. I can control it with the Godox Light.

We wanted to make it look like a window, so we grabbed this room divider and set it up to make it seem as if it was a source that light would actually shine through. This actually has a nice little frosted panel that helps just make it look even more believable within our scene. So we went with that and there's our fake window. We've got a Godox LD1 50R right back there behind that little panel, and that's given us that nice, cool blue light. I'm easily able to adjust the color temp with the Godox Light app that I'm using here and I can see it in real-time with my camera setting. That's one really cool thing about being able to use the app as you're looking at your shot in real-time.


The idea here is to build off these practicals. These practicals give off this warm yellow tone and we're going to use mirrors to reflect spotlights onto our scene. That makes more of a danger dream type illusion that's going on inside the composer's mind. Whenever you're filming in a tiny space, one trick that you can use is using mirrors as windows. We're using this reflective mirror in these go Godox S60 spotlights and we're moving this light in a direction like so, and it is casting these really cool shadows all across our scene. Right here we have two Godox S60 spotlights and what these are doing is they're hitting off this mirror and that's projecting all those moving images and shadows across the background of our overall scene.

On this specific light right here, it has the 85 millimeter lens projection attachment and it has a gobo of a window inserted in there and a CTO gel on the front just to warm up the overall image.

And this light has the barn doors and more of a wide beam, and that's to help the exposure brighten up just a little bit throughout the overall scene as it hits off the mirror.

It's important to have two different types of projections hitting your mirror because that way there's a difference between each light and so you're not casting the same duplicate image across your background.

What we have here is the Godox TL60 and this is an RGB tube light. You can control all kinds of colors with it, millions of possibilities. And for this, what we wanted to do was match the tone that was coming from the other practicals in the scene and this light is serving as a nice backlight for our subject.


Our camera is right over here and this is helping highlight this area around him and it helps bring him out from the background and also helps compliment the blue tone that we have back here in the background.


To go along with the theme of moving lights all throughout the background, we wanted to add another light to the other side across from the mirror. So we have a Godox ML60. This is a battery-powered handheld light, if you want to hold it handheld, which is really cool. It's super bright. So what we're going to do with this one is we're able to move it up and down and what we have here are these trees and these artificial plants placed all on the stand and this is helping cascade different kinds of shadows all across our environment and our subject just to compliment the other spotlight stuff that's happening with the mirror on the other side.

Hopefully, this example of using moving lights in a tiny space can help enhance your scenes for any of your future projects.